WRITING A PICTURE BOOK IN SCRIVENER - FREE SCRIVENER TEMPLATE
Isn’t Scrivener just the best writing app in the world? It is so versatile and reasonably priced. Many different sorts of writers use it for lots of kinds of work. I have used it write my Lambton Worm graphic novel manuscript using a comic book template. i have also made my own children’s picture book template that I am sharing with you Here as Scrivener doesn’t come with one and I couldn’t find one online.
Choose your version here, Mac or PC, the UK version is formatted to A4 size paper and the US version is formatted to US Letter size paper. Warning, I do not have access to a PC with Scrivener on anymore so I can no longer update that version sorry.
To find out how to use my Scrivener Picture Book template, I have a tutorial video here or scroll down for illustrated written instructions. At the bottom I have also included a video on the anatomy of a picture book which this template is based on. I hope you find it useful.

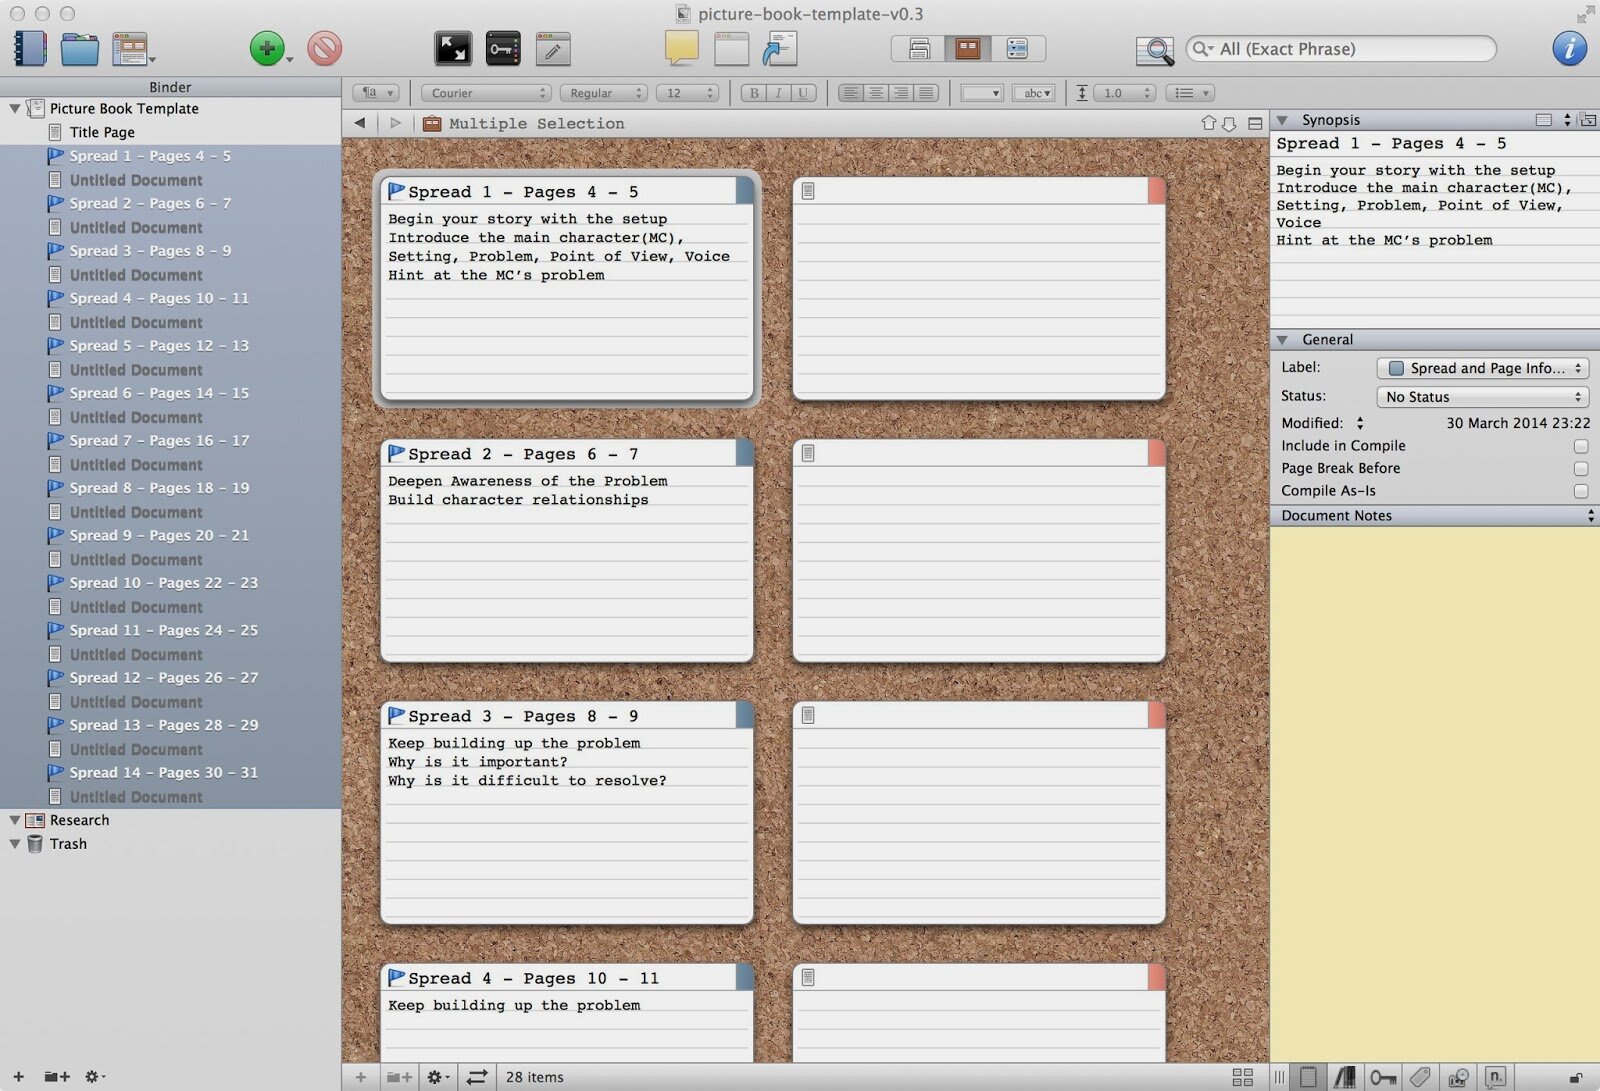
Once you've downloaded the zip file, extract and move the .scriv file to your writing folder and when you open it up in Scrivener it should look like this:
On the left, in the Binder window, we see a list of documents either entitled Spread … or Untitled Document. As most picture book writers know, picture books adhere to a very strict form due to the way they are physically constructed. The pages are printed, in multiples of eight, onto large sheets of paper, which are called a signatures. So most modern picture books are told across fourteen double page spreads (each single page is a spread) totalling thirty two pages and the story usually begins on page four or five. So in my template there are 14 Spread documents which serve, when writing your picture book, as headings to help you plan your page breaks.
The first document in the Binder is the Title Page, I have included this to help with submission to editors and agents. In the Editor window, in the middle, add your name, address, telephone number and email on the top left and the manuscript wordcount on the top right. Your title of your picture book must be centred and written in capitals, your name should be below that and then your story begins. The template has centred page numbers in the footer and a right-aligned header of the Scrivener document file name (which you should name as your “surname - title” of your story). The whole template is formatted using SCBWI's recommended 12pt Times New Roman font, double line spacing and 1 inch margins.

If you wish to write without the Spread headings visible in the manuscript, select only, by Command-Clicking (or Control-Clicking on a PC), the Untitled Documents in the Binder window as shown here highlighted in blue.

The Corkboard view in Scrivener is really useful for plotting your writing, it is switched on by pressing this icon:
In the Binder, Shift-Click select the first Spread document and the last Untitled Document to display the Corkboard as as shown on the left.
Picture Books have a generally acknowledged plot structure consisting of a beginning, middle and end, three problems to solve, etc., so I have used this structure to create plot prompts that are visible on the Spread index cards in the Corkboard view. You can then write synopses on the Untitled Document index cards and/or add images. I have more to add on using the Corkboard my video tutorial.
Well I hope that this is useful to the Scrivener-using, picture book writers out there. Any feedback is welcome, especially if I need to fix something. If this has been useful to you then please follow me on Social Media, share on your own social media channels, sign up for my newsletter or even support my work with a purchase from my shop, thanks.